Setting up of Onemoney Account
Have a quick look at the video below to understand the flow from signing up for Onemoney, Discover and link accounts or you alternatively follow the steps explained below the video.
1 Install the app from Play Store
Install the app from Android Play Store. <Play store link to be included>
2 Sign up for Onemoney
To start with, Signup for Onemoney account. Mobile number must be unique across Onemoney and the same mobile number once registered cannot be used for Signup once again.

3 Verify OTP
Once user signs up for Onemoney providing mobile number. The mobile number must be verified using OTP. OTP is sent to the mobile number provided during signup.


4 Create Onemoney VUA
Once the mobile number is verified then user will then proceed to create the Onemoney VUA. By default provided mobile number becomes the Onemoney VUA but can be modified as required.

5 Ready to Link Accounts
Once the Onemoney VUA is created then the user can proceed to link accounts.

6 Select Financial Institution
Once the user is ready to link accounts then he proceeds to select the financial institution to link accounts. Financial Institution selection screen has the following components.


7 Account Discovery
Account discovery is initiated by providing the needed identifier that varies from one financial institution to another. Identifier required is displayed against each financial institution on the Financial institution screen.

8 Initiate Account Linking
Once the accounts are discovered then the accounts linking can be initiated by selecting the required accounts from the list


9 Authorize OTP

10 Account Linking Complete
Once OTP is verified then the account linking process is complete for the Financial Institution and dashboard is opened.

11 Dashboard
Once the account linking process is complete then dashboard is displayed with the activity log.

Account Discovery and Linking
During sign up the accounts can be linked and also at a later point of time user can link accounts. The process flow below explains the discovery and account linking process at a later point of time after the user registration is complete. User need to login to discover and link accounts.
1 Login to Onemoney application

2 Initiate Add Account Option
Once Logged in, Click on the accounts option at the bottom of the screen just beside dashboard.

Click on the ‘+’ button available to discover new accounts.

3 Selecting Financial Institution
‘+’ button allows you to link bank accounts to your Onemoney VUA via two quick steps. First being, Selecting the Financial Institution(FI) required to discover accounts. Second being using the identifier required by Financial Institution to be able to discover accounts.

4 Account Discovery
Account discovery is initiated by providing the needed identifier that varies from one financial institution to another. Identifier required is displayed against each financial institution. In the screen shot below mobile number is the identifier used to discover accounts at the FIP. Mobile number must be the registered mobile number with the selected financial institution or bank. Once the identifier is verified then the accounts discovered with the financial institution are displayed.


5 Initiate Account Linking
Once the accounts are discovered then the account linking is initiated by selecting the required accounts from the list and by clicking on “Link Account”. One or more accounts can be selected from the list to initiate the linking process.

6 Authorize OTP
A One time password (OTP) is sent to the registered mobile number by the Financial Institution during account linking process.

7 Account Linking Complete
Once OTP is verified then the account linking process is complete for the Financial Institution.

8 Linked Accounts List
Click on “Continue” to get the list of linked accounts present in the accounts screen. Accounts are categorized and displayed with respect to account type or Financial Information (FI) type.

Approve a Consent
A consent request sent by the FIU can be approved. Only once approved, FIU will be able to fetch financial data as per the consent request details from the accounts added to the consent while approval.
1 Consent Request
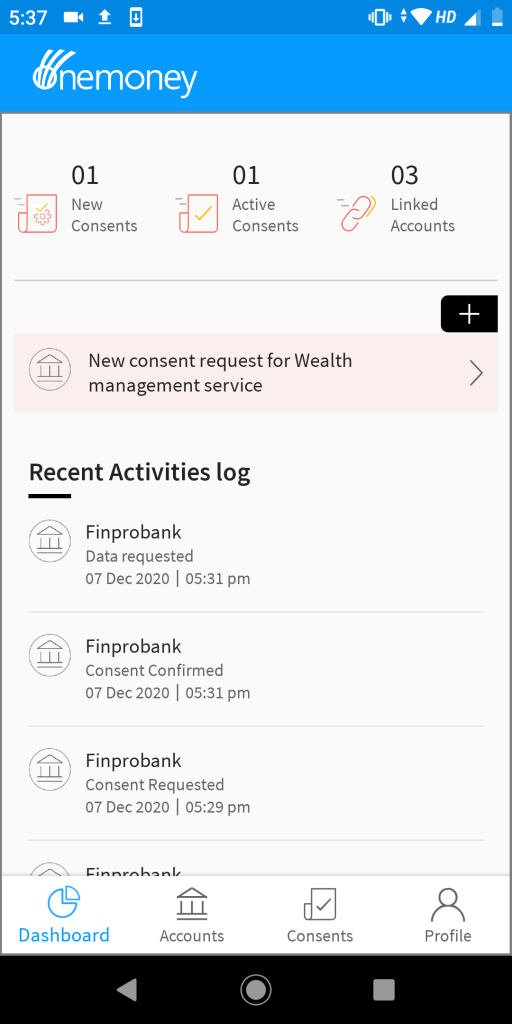
Whenever a consent is raised, It first appears on the dashboard with an arrow option to redirect into the consent screen available at the bottom of the screen.

2 Consent Screen
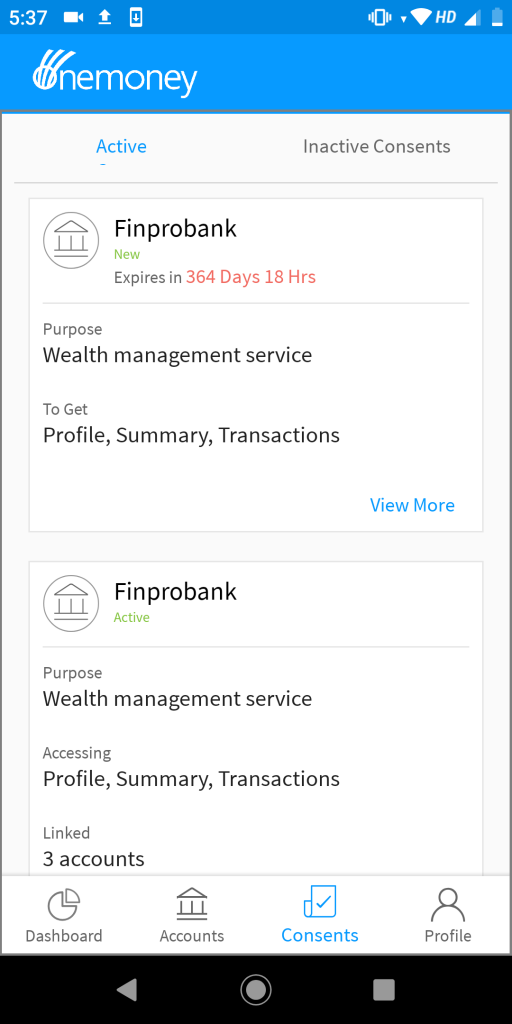
On clicking the arrow, the screen is redirected to the consent screen where the details of the consent can be obtained by clicking on view more option.

3 Consent Details
On clicking View More, the complete details of the consent request raised that includes Purpose, Type of Data Requested, Frequency of Data Pull, Data Filter details will appear.

4 Approve Consent OTP Trigger
By Clicking on the Approve button at the end of consent details, an OTP is triggered to the customer’s registered mobile number at Onemoney which can be used for approving a consent request.

5 Approved Consent
On Confirming the OTP, Consent Request is approved.

Reject a Consent
A consent request sent by the FIU can be rejected by the customer. This will not allow FIU to fetch any account data. A rejected consent cannot be approved at a later date. Notification will be sent by Onemoney to FIU informing the status of the consent to be rejected.
1 Consent Request
Whenever a consent is raised, It first appears on the dashboard with an arrow option to redirect into the consent screen available at the bottom of the screen beside profile.
2 Consent Screen
On clicking the arrow, the screen is redirected to the consent screen where the details of the consent can be obtained by clicking on view more option.
3 Consent Details
On clicking “View More”, the complete details of the consent request raised that includes Purpose, Type of Data Requested, Frequency of Data Pull, Data Filter details will appear with an option to approve or reject a consent.

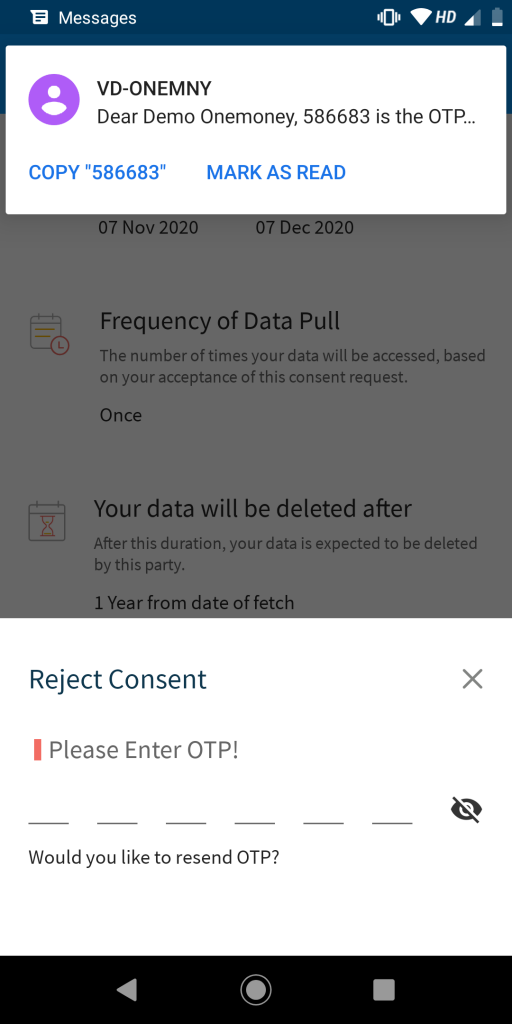
3 Reject Consent OTP Trigger
By Clicking on the Reject button at the end of consent details, an OTP is triggered to the customer’s registered mobile number at Onemoney which is used for rejecting a consent request.
4 Rejected Consent
On Confirming the OTP, Consent Request is rejected.

Pause an Active Consent
An active consent can be paused to restrict FIU from fetching financial data. A paused consent can be resumed at a later date to again allow the FIU to fetch your financial data from the linked accounts added in the consent. A notification will be sent by Onemoney to the FIU that the consent is Paused.
1 Consents List
List of all the active consents appear in the consent screen of the Onemoney Android Application.

2 Consent Pause OTP Trigger
On Clicking “Pause” button for an active consent, an OTP is triggered to the customer’s registered mobile number at Onemoney which is used to pause the active consent.

3 Consent Pause Successful
On a successful confirmation and verification of OTP, Consent is paused.

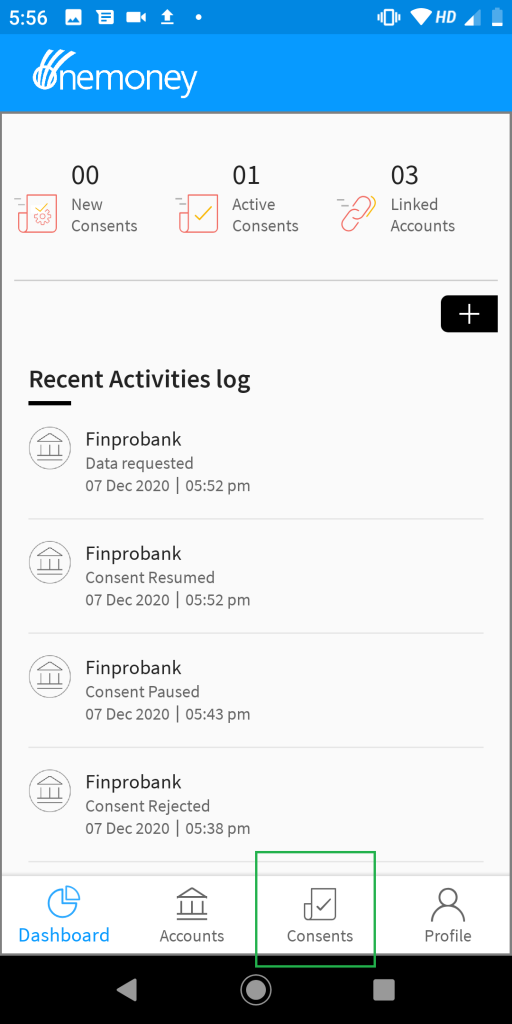
Paused Consents will move from Active tab to Inactive Consents tab with an option to resume at a later date.

Resume a Paused Consent
A paused consent can be resumed when you want to permit the FIU to fetch your financial data. A notification will be sent by Onemoney to FIU that the consent is resumed.
1 Consents List
List of all the inactive consents appear in the consent screen of the Onemoney Android Application.

2 Consent Resume OTP Trigger
On Clicking on the resume button of the selected inactive consent, an OTP is triggered to the customer’s registered mobile number at Onemoney which is used to resume the inactive consent.

3 Consent Resume Successful
On successful confirmation and verification of OTP, consent is resumed. Resumed consent will move from “Inactive Consents” to “Active”.

Manage my Consents
Manage all your consents from the consent dashboard and also view the event timeline against each consent to understand clearly when the financial data is been fetched by the FIU etc.
1 Select Consents menu from Dashboard
Select the Consents option available at the bottom of the screen just beside profile to view consent dashboard.
2 View Active Consents
On opening Consent screen, displays the active consents.
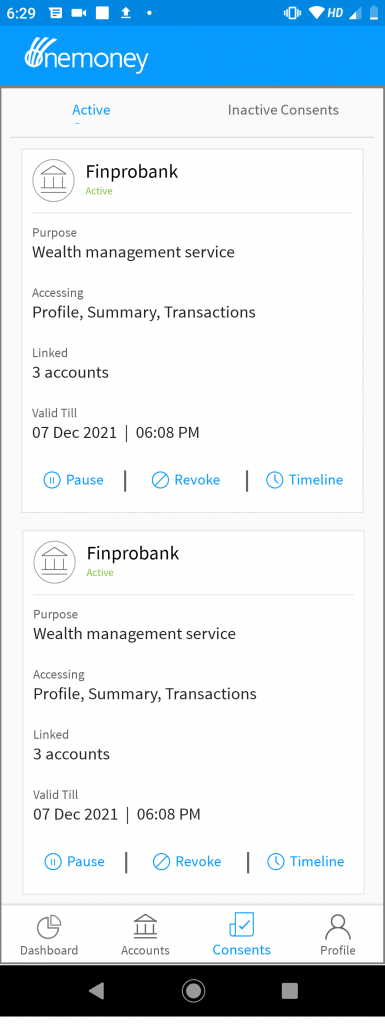
3 View Inactive Consents
Select the Inactive Consents tab to check for the inactive consents.

Consent Timeline
1 Consents Screen
Go to the consents screens available at the bottom of the screen as there in the below screenshot.

2 Select Timeline Option
Click on the timeline option available for a consent.

3 Detailed Consent Timeline
On clicking on the timeline, gives a detailed timeline for the selected consent.

Revoke an Active Consent
An active consent can be revoked. Kindly note a revoked consent cannot be resumed and revoke consent permanently prevents FIU from fetching financial data for this consent.
1 Consents List
List of all the active consents appear in the consent screen of the Onemoney Android Application.

2 Consent Revoke OTP Trigger
On Clicking on the revoke button of the selected active consent, an OTP is triggered to the customer’s registered mobile number at Onemoney which is used to revoke an active consent.

3 Consent Revoke Successful
On a successful confirmation and verification of OTP, Consent is revoked.


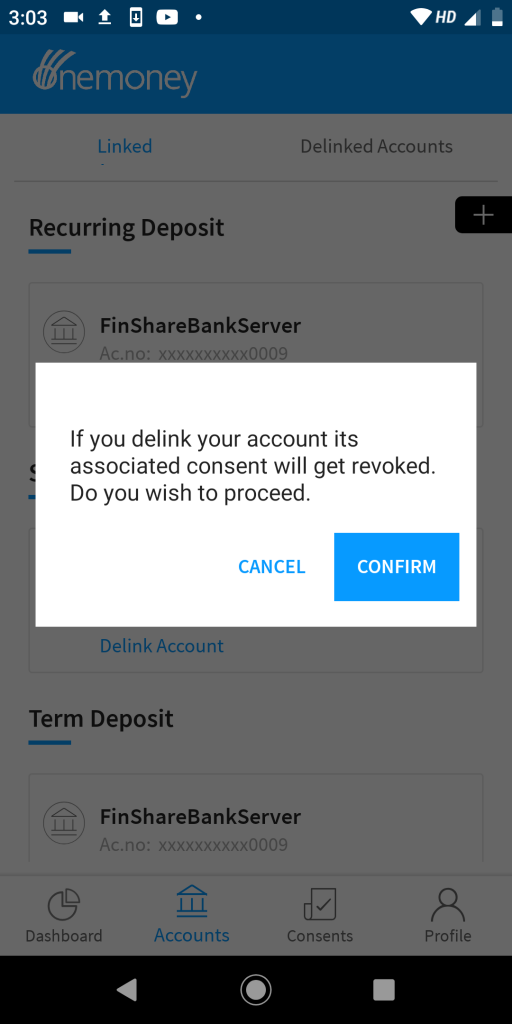
Remove / Delink a Linked Account
An account already linked can be delinked or removed at a later point of time. Kindly note if an account is delinked then if the account is associated with any Consent then it will be removed from those consents as well. Also, note that if this is the only account added in a consent then consent will be revoked on delinking the account. An account delinked can again be linked later but revoked consents because of delinking an account will not be resumed.
1 Open Accounts Screen
Select the accounts screen beside the consent dashboard screen as there in the screenshot below


2 Delink an Account
Clicking on the “Delink Account “option available, You will be asked for confirmation of account delinking to remove your account.
3 Account Delink OTP Trigger
By clicking on confirm, a one time password(OTP) is sent to the provided mobile number at the time of account discovery.

4 Account Removal or Delinking Successful
Upon confirmation and verification of OTP, account delink is successful. Once the account is delinked then will be moved from Linked list to Delinked accounts list. At this point of time any consents that have only this account linked are also revoked and for any consents this account is available along with other accounts this account will be removed.

Reset PIN
Forgot PIN? no problem please follow the steps below to reset your PIN and proceed using Onemoney Android app.
1 Login Screen Forgot PIN option
If you forgot your Onemoney login PIN, Use the Forgot PIN option available in login screen.

2. Enter the details for Validation to reset PIN. Kindly note the mobile number entered must be the number used to register with Onemoney.


2 OTP Trigger
Use Onemoney registered Mobile Number to generate OTP to reset PIN.

3 Create New PIN
Enter OTP sent to your registered Mobile Number and enter/create a new pin.

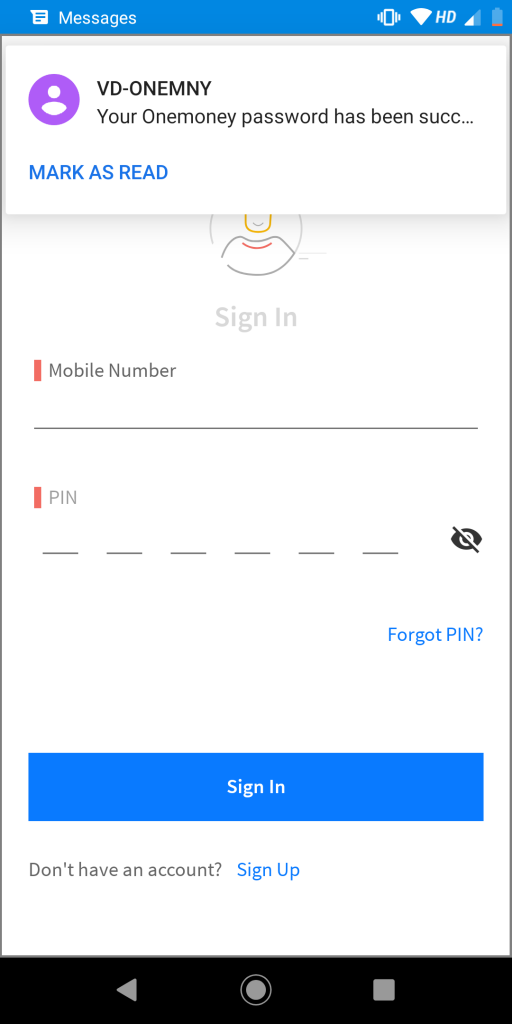
4 PIN Reset Successful
Submitting your request, will reset PIN successfully. SMS will also be received to your registered mobile number for the PIN reset confirmation.

5 Login Successful
Use the new PIN to login successfully.
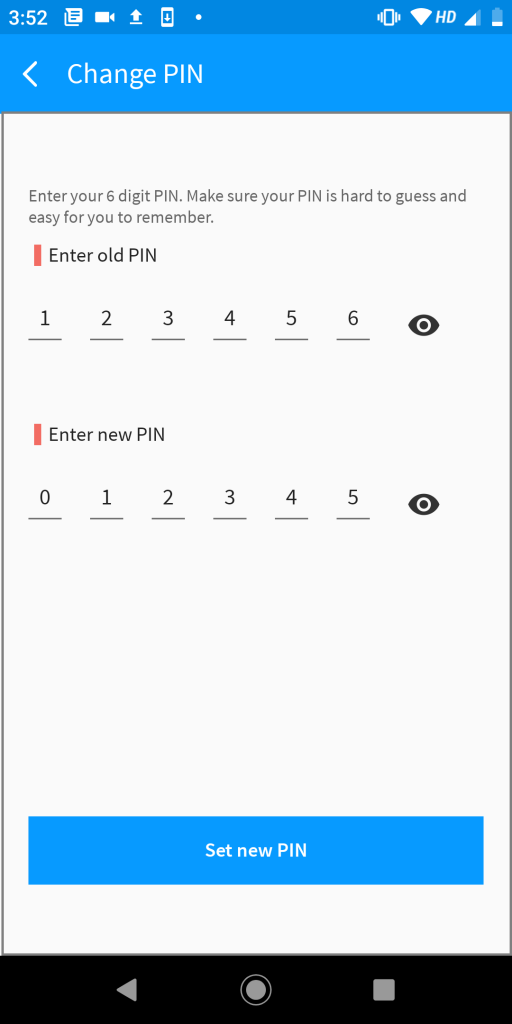
Change PIN
As a security measure its always advisable to change your PIN at regular intervals. Below steps explain on how you can change your PIN.
1 User Profile
Click on the user profile button present at the bottom of the screen.

2 Change PIN
Use the change PIN option available under profile settings menu.

3 Create New PIN
Enter your old PIN and create a new PIN.
4 PIN change Successful
Save to successfully change the PIN.

5 Login Successfully using new PIN
Use the new PIN to successfully login to Onemoney android application.

Logout from Onemoney Application
Once the application usage is complete its always advisable to logout of Onemoney app. Kindly note even if you don’t log out of Onemoney application manually session ends after 20 minutes of inactivity and you will be prompted to login to continue when you resume.
1 User Profile
Click on the user profile button present at the bottom of the screen.

2 Logout
By clicking on the logout option available, triggers a confirmation message for user session logout.


3 Successful Logout
Upon hitting “YES” for user session logout confirmation, user will be successfully logged out and redirected to the login screen.

Close Onemoney Account Permanently
We really can help you! before closing the account kindly note that all consents, accounts linked etc. that are associated with Onemoney will be removed when you close your account. However Onemoney may retain some information for audit purposes. Account once removed cannot be retained at a later point of time.
1 User Profile
Click on the user profile button present at the bottom of the screen.

2 Close Onemoney Account
Click on Close Onemoney Account option available under user profile settings.

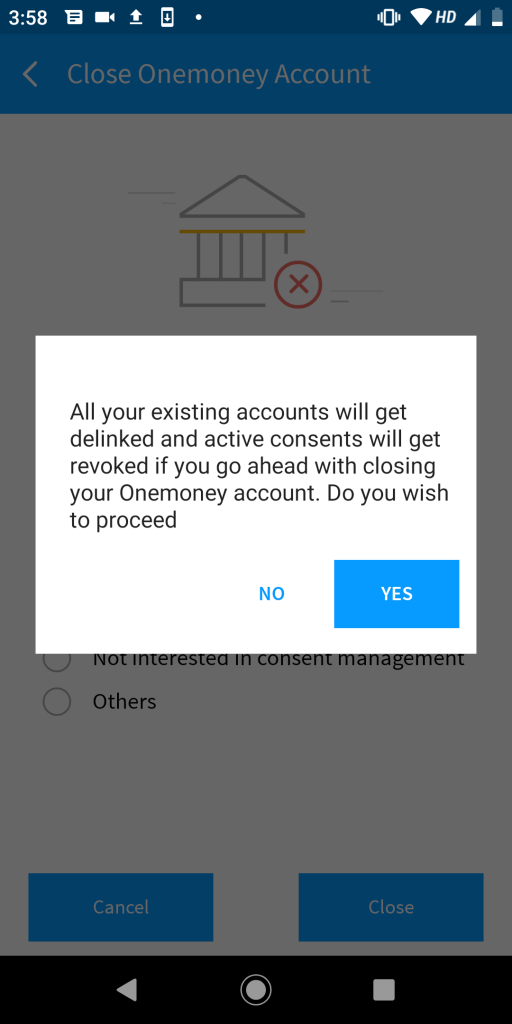
3 Account Closing Confirmation
You will be asked for confirmation for closing Onemoney account, remember that by closing the account all the active consents will be revoked and deleted along with all the bank accounts being delinked.
4 Select Reason for closing account
You will be prompted to select an option for closing the account as in the below screenshot.

5 Close Account OTP Trigger
Upon selecting the reason and clicking on close button available, a one time password(OTP) is triggered to the registered mobile number at Onemoney.

6 Account Closing Successful
By confirming and verifying OTP, your account is successfully closed at Onemoney. We will really miss you!

Incase your query is not answered yet or have any kind of clarification then please write to helpdesk@onemoney.in and we will be happy to assist you.